

This pie is dedicated to my friend's new born son, as you can see from the crumbling crust inscription resting happily on top of the pie ;).This is also my entry to Cook Sister's blog event Waiter, there's something in my pie!
The recipe for this pie is one R and I have been making over the last few winters. We discovered this recipe while experimenting with a huge pack of frozen berries picked up from the local TJs. Thawed the berries, looked around the pantry, where we had lemons, ginger, almonds, and lotsa alcohol (see how that useful that can be ;). Voila, right there a simple, crowd pleasing "family" recipe was born!
The best part is you can use any left over pie filling, as a berry sauce on almost any dessert, be it crème brulee, ice cream or similar desserts of your choice. Now who can complain about a two-in-one dessert? Or if you are like R, it can be your sugar rush for the week by eating spoon full of the good stuff and justifying it as eating berries that are good for you…..right!
Mixed Berry and Ginger Pie Recipe
Ingredients
For the Filling:
3 cups of frozen berries. You can use any mixed berries like blueberries, strawberries and gooseberries.
1 cup sugar
1 cup toasted slivered almonds
¼ inch ginger diced thinly
1 tsp lemon juice
½ cup red or white wine
2 tsp orange liqueur (optional)
1 tsp butter
For the Crust:
2 ready to bake pie shells/crusts (1 for the base and the other for the top). I use the TJs gourmet pie crusts, as they are amazingly easy to use
1 tsp butter
Method
For the Pie Filling
In a deep pan, melt the butter. To that add the thawed berries, sugar and wine. Let it cook for a while till the mixture reduces. To that add the lemon juice, ginger and orange liqueur. Let this mixture cook for about 1-15 minutes. Stir occasionally Remember to cover the pan with a lid, as the liquid tends to jump around a fair bit. Taste the filling and add more sugar according to taste.
For the Pie:
1. Pre heat oven to 425 degrees
2. Thaw both pie crusts (if frozen) for about 15 minutes till they come to room temperature and become pliable
3. Place the pie crusts onto your work area and flatten them individually.
4. Gently move one of the flattened pie crusts to a 10 inch pie pan.
5. Add the pie filling and sprinkle with toasted almonds
6. Place the 2nd crust over the filling. Brush with melted butter
7. Wrap the excess top crust to seal the pie. Make slits in the top crust to make sure the steam has an outlet
8. If you have excess dough remaining, you can use it to decorate the top of the pie
9. Bake the pie at 425 degrees for 15 minutes. Remove from oven and cover the sides with foil. This will keep it from getting too brown (SOMETHING I FORGOT TO DO :(). Bake at 350 degrees for another 25-30 minutes, or till the crust starts to brown.
Note: This pie does not need a lot of cooking time, as the inside filling is already cooked.
Enjoy!!
Sunday, February 25, 2007


Sunday, October 08, 2006

A friend of mine S, had her baby shower last month, and so I decided to bake her a special cake for her special day!
However, as soon as I accepted the invite with a response saying, “I am so there and will bring cake”, I panicked!! I had never baked a “real” cake before. Sure there have been experiments with some upside down pineapple cakes, and some scary looking Halloween cakes, where am sure you could guess at this point which part of it was scary ;)
But as this friend is one of the nicest people I know, I was determined to rise to the occasion. No pun intended {-)
Well, finally the cake did get made. I definitely cheated a bit by using some instant karma err mix. I found this super simple recipe in the book “The Magic of Microwave Cookbook”. My favorite part of the book is a 1977 hand written message from a mother who apparently gifted this book to her daughter. It goes something like this “Forget what you ever knew about cooking. Relax, and have fun! Love always – Mother”. Sound advice indeed!
Chocolate Pudding Cake Recipe
For the Cake:
Ingredients
1 package chocolate pudding
1 package (9 ounces) chocolate cake mix (I used moist cake mix)
Method
Prepare pudding according to package directions. Spray the baking dish (12X8 inch) with cooking butter/oil spray. Pour pudding in a baking dish. Prepare cake mix according to package directions. Pour over pudding. Microwave 10 minutes on High, or until a wooden pick inserted in the cake center comes out clean. Once cooled, remove from the baking dish and cover with chocolate frosting.
You can purchase a chocolate frosting package, or prepare it yourself. I also added a little drizzle of cream mixed with sugar syrup on the top to add some color.
For the Chocolate Frosting:
Ingredients
2 squares unsweetened chocolate
1 tablespoon water
1/3 cup butter
3 tablespoons light cream
1 teaspoon vanilla essence (optional)
2 to 21/2 cups confectioner’s sugar
Method
Combine chocolate and water in a bowl. Microwave 30 seconds on high, or until chocolate melts. Stir until smooth. Mix in butter, cream, and vanilla essence. Beat in sugar until frosting reaches a desired consistency (enough to be able to spread over the cake).
Now the moment of truth: I started out with the ambitious idea of preparing this spectacular cake, which Keiko created. Since my cake wasn’t even close to what she whipped up, I purchased a cake from Trader Joe’s to accompany my chocolate pudding cake (as a backup ;), and topped it with white chocolate shavings and fresh organic roses. All in all the cake episode ended well, with the cake I prepared tasting good, and the cake I purchased and decorated at home, looking great!!
Chocolate Cake from Trader Joe's (decorated at home) 
Friday, July 21, 2006
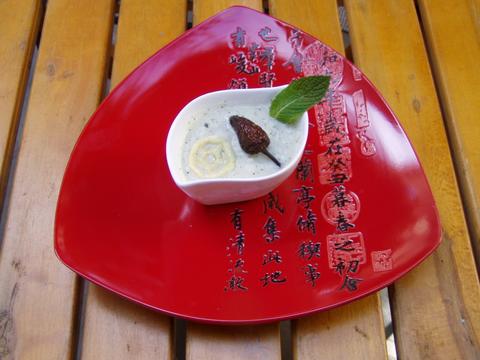
Given the intense heat wave hitting California this week, I decided to try out fellow blogger Ashwini's chilled cucumber soup recipe.
The soup was very simple to prepare, and was thoroughly enjoyed by R and me in our lush green Japanese Zen garden. We could not have found a better way to cool off!!
I loved the light green color and the creamy yet crunchy texture of the soup. I am usually not a huge fan of cold soups, as soups to me conjure up images of warming up a cold evening! However, this soup is definitely a keeper with its ability to beat any heat wave! It is also ideal as a palate cleanser as a start to a multi-course meal.
I made some minor modifications to the recipe based on what was available in my kitchen. Also added some crunchy garnishings like a fried masala chili & fryums. The spice and crunchiness of the garnish added that extra zing to this very refreshing soup.
Cucumber Soup Recipe
Ingredients (serves 2)
1 cucumber, peeled and diced
1 spring onion chopped (the small white onion part only)
1 clove garlic
1 green chili chopped
1/4 cup plain yogurt
2 tbsp or more sour cream
3-4 mint leaves
1 tsp fresh dill
salt and pepper according to taste
For the Garnish
Fryums (available in Indian grocery stores)
Yoghurt marinated chilli (available in Indian grocery stores)
1 mint leaf
Method
1. Add salt, pepper, garlic and chilies to the diced cucumber and onion. Marinate for 20 minutes.
2. Drain excess water into another container and keep it aside.
3. Put all the marinated cucumber and onions into a blender. Add yogurt, dill and mint and blend until smooth. Add the drained water if soup is too thick.
4. Add salt and pepper if needed
5. Pour into inidividual serving bowls and cool in the refigerator for 2 hours.
6. Fry the yoghurt chili, and fryums.
7. Just before serving, stir in the sour cream and garnish with the fryums and fried chili. You can altertaively garnish the soup with a sprig of dill or the spring onion.
Friday, July 14, 2006

The inspiration of this recipe comes from a visit to Chaat Paradise in Mountain View.
This was the 1st time I had a "healthy" (or atleast a perception of it being healthy :) version of the famous Bhel. Bhel, is one of the essential street foods of Maharashtra. Beaches and waterfronts of Bombay are lined with vendors competing with each other to sell Bhel puri to evening and weekend strollers. There is probably not a single person in Bombay who has not savored this super yummy snack at some point of time or the other.
Bhel literally translated means a mixture of stuff, and that’s exactly what it is! It’s a mixture of puffed rice, spicy farsan/sev, raw onions, tomatoes, green chilies, potatoes, mint and tamarind chutney, all brought together to pack a punch of spice and amazing flavor!
Sprout Bhel Recipe
Ingredients (serves 4)
For the Dry Mix
1 small packet of Puffed rice
1 medium sized onion, finely chopped
1 cup tomato, finely chopped
1 cup coriander, finely chopped
3 green chilies chopped into tiny pieces
¼ cup sliced raw mango
1 packet of Bhel mix/Farsan (available in Indian grocery stores)
3 tsp thin sev
For the Sprouts
1 cup moon sprouts (available in Indian grocery stores). Alternatively, you can soak some whole moong daal overnight in warm water and let hang tied up in a cotton cloth for a day.
1 tsp dhania-jeera powder
1 tsp red chili powder
¼ tsp garam masala powder
Salt to taste
Mint Chutney
I bought this from the Indian grocery store. Alternatively, you could find the recipe here: http://www.epicurious.com/recipes/recipe_views/views/109654
Tamarind-Date Chutney
I bought this from the Indian grocery store. But you can find the recipe here: http://great-swad.tripod.com/indiancuisine/id110.html
Method
1. Mix the sprouts, salt, lemon juice, dhania-jeera powder and garam masala in a microwaveable bowl. Add 2 teaspoons of water and cook for 2 minutes in the microwave. Remove and let cool.
2. In a separate deep bottomed bowl, mix all the dry mix ingredients for the bhel, the mint and tamnarind-date chutney, and the sprouts mix.
3. Mix well
4. Garnish with thin sev and green chillies and serve immediately
Thursday, June 22, 2006
The new kitchen has a bright happy look, where it opens into a lush backyard replete with a Japanese garden created by the previous owners. As you can imagine, we can't thank them enough!!
Hope you guys enjoy the recipes coming out of this fresh new kitchen as much as I do creating them !!!
